One of my colleagues at work mentioned that there was a camper van being advertised on the internal classified ads at work, for free. I'd always fancied having a camper, but had never really given them much consideration in light of the seemingly astronomical prices they fetch even in poor condition. Suffice to say, I decided to give it a look, even though I wasn't in any way, shape or form looking for another project!
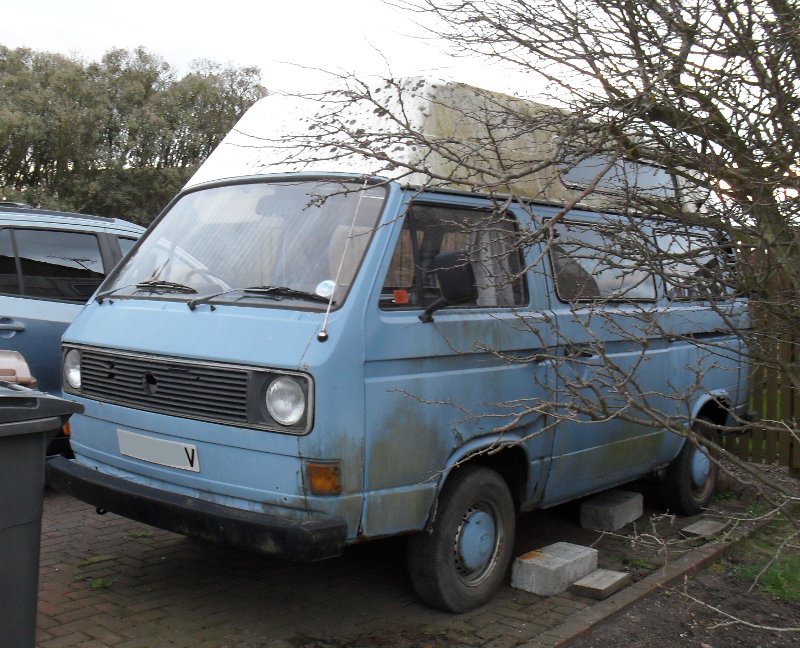
After a brief chat with the owner, I arranged to have a proper look at it. I discovered a very early T25 Transporter, sitting under a tree and looking very, very sorry for itself. While the interior was filthy, somewhat musty but mostly intact, the exterior was another matter. The entire vehicle pretty much was green with moss, the side door had actually partly detached itself from the vehicle and was jammed half shut, and the front doors clearly contained nearly as much filler as they did metal.
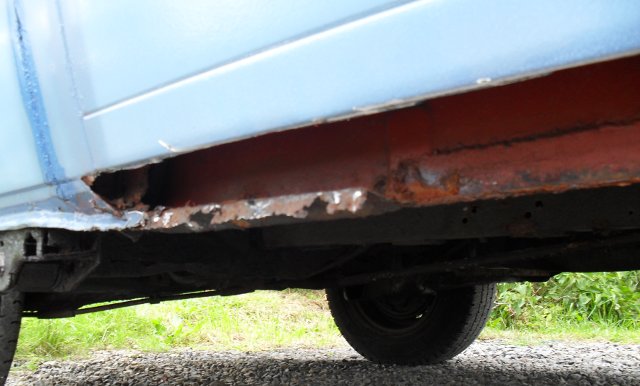
A crawl around underneath however revealed a better story than I had expected. The vehicle had obviously been professionally rust-proofed at some point in its past. This had resulted in its underside surviving surprisingly well given that it had spent eight years sitting in a driveway near to the coast. By and large everything was solid; the only exceptions being the two inner sills, the one on the nearside needs some remedial work, but nothing too dire, and the offside inner sill which needs rather more significant reconstructive surgery. The actual chassis damage seems to be limited to one of the nearside rear chassis outriggers which shouldn't be too hard to repair as the rust is pretty localised. The sill though is without doubt going to be the hardest repair given its proximity to the mounting point for the rear suspension. Cosmetically there was a LOT of work to do, but overall for a 31 year old vehicle, it really didn't seem too bad. Definitely a worthy project at first glance. A charity had apparently shown interest in it a year or so back and had got as far as putting four new tyres on it before unfortunately having their funding withdrawn. The plus side of this at least meant that it saved me having to buy tyres!
Further discussions revealed that it hadn't turned a wheel in about eight years, and that a couple of years ago they'd tried to get it started to no avail. With no signs of life from the engine whatsoever. This was where my interest started to waver somewhat. I knew from prior experience that there is no way that you can get a vehicle transporter up my driveway, it's just too steep. If it was going to be a project that I was to take on, it needed to be able to move under its own power - even if only for short distances! In the words of the owner, "it would be a miracle if I could get it to start."
Now at this point I'd never even looked at a VW engine before (well, not an old one anyway!) nor had I ever laid eyes on an air-cooled engine in a car before. So I knew that the next while was going to be a voyage of discovery. As the battery in it was completely stone flat (not surprising given that the headlights had been left on for the last eight years), and I hadn't come armed with jump leads, there wasn't much more I could do that day. So I vowed to come back the following day, my aim being to see if I could get the engine to turn over. I didn't much care at that point whether I could start it, if I could just prove it wasn't seized, I would be happy and definitely have a go at it as a project. Based on what I'd heard, and (mostly) just good old gut feeling, I had a feeling though that there was life left in this old engine yet though.
As promised, I returned the following evening, armed this time with a multi meter, a pair of jump leads and a selection of screwdrivers and spanners. Now having a fairly small driveway to work with and a battery situated underneath the drivers seat makes connecting up your less-long-than-you-would-really-like jump leads rather awkward! After rather a lot of fiddling around trying to get the seat un-seized so it would move forward, I eventually managed to get things connected up. The ground lead ended up connected to the door locking pin, which also served the dual purpose of stopping the door closing and kinking the other cable. At this point, the interior lights flickered into life for the first time in years - as did the headlights. No wonder the battery was flat! I decided that I'd give the two batteries (the second one I assume had been bought with the intention of use with a split charge system...but wasn't actually connected to anything!) the benefit of the doubt and would see if they could be revived later. The non-connected one was still showing about 6V off load. At this point we hit a snag. The ignition key snapped in half while someone was trying to open the fuel cap (with the wrong - and admittedly rather flimsy - key). That stopped progress for the night in its tracks really.
A few days later when a replacement key had been sourced, I returned armed with a (very) good battery from my Lada, some battery terminal clips to allow me to use that post terminal battery in the place of the spade terminal original, some petrol, a whole afternoon's worth of time, and a lot of determination.
Needless to say, it wasn't as simple as connecting the battery up and turning the key. Doing this got me power to the vehicle, warning lights on the dashboard - but no life from the starter. I'd figured out by this point that I could get at the back of the starter motor from behind the offside rear wheel - so having made VERY sure that it was out of gear and the wheels were blocked in place by large bricks, I disappeared under that corner armed with a Very Large Screwdriver (TM) to see whether I could get any more signs of life by taking the solenoid out of the equation. Shorting the terminals out initially achieved absolutely nothing aside from creating an incredibly impressive shower of sparks. Very Large Screwdriver was then turned the other way around, and I set about beating the living daylights out of the starter motor with it. Bridging the starter motor terminals this time resulted in a slightly less impressive fireworks display - and after a moment the sound of a spinning starter motor. Wasn't turning the engine - but was spinning. The percussive attention was then turned on the solenoid. Next time around, sure enough, the engine turned a fraction - that was all I needed to get me bouncing around and grinning like an idiot. That healthy dose of violence seemed to have got the starter system in order as it was happy to turn over on the key from then on.
While I was on a roll, I decided to see if I could go one better, and get it to actually run. I replaced two fabric braided fuel hoses on the inlet side on sight, and went to put some fuel in the tank. That was made slightly harder when I discovered that the fuel filler neck to filler cap rubber flexible section had rotted away completely! A bit of juggling though got a gallon in the tank. I don't like using products like Easy-Start unless I've no other choice, in the case of an engine being started for the first time like this, I prefer to draw fuel through just by pouring a bit into the carb at a time and letting the engine run on actual fuel. Before any petrol was put near it though, it was cranked over with the LT connections to the coil removed until the oil pressure light went out.
First moment that it was cranked over with fuel in the carb the engine burst into life with what sounded like a round of machine gun fire. Unsurprisingly it died a second or so later when it had used that fuel up - this process repeated a few times until rather than dying, it coughed a bit but kept running. It was tappety as all hell, idling about 1000rpm too fast, and would stall if you so much looked at the accelerator, but it was running. Bonus points were gained from the fact that it was running on all four cylinders, and that the (expensive!) exhaust system seemed to be completely intact.
There's a brief video on YouTube of its first waking moments here.
This should be compared to how it now sounds, having been serviced. Here.
The final test for that day I decided was to see whether it would actually move...bearing in mind that the handbrake had been left on for most of its eight year slumber. Much to my surprise, it did...yes, the brakes were dragging, but it moved without any serious effort - and even stopped again when I ran out of the few feet of driveway I had to work with.
Suffice to say that the current owner was suitable shocked to hear the engine run!
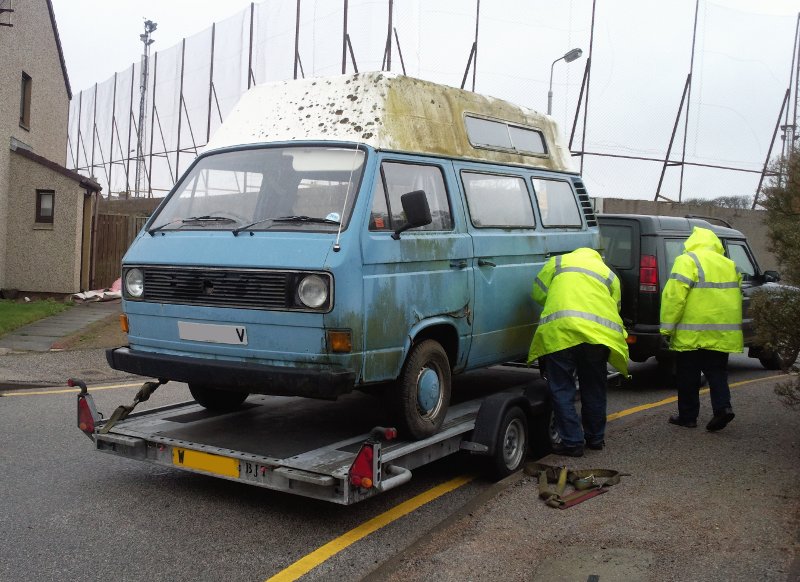
That was the day that I said "Yes please!" and the current owner decided that out of all the people who had been and looked at it, I was the one he wanted to give the van to. The very next morning, a phone call was made to Aberdeen Vehicle Transport to get it picked up that weekend to go to its new home. On a cold, damp, windy Friday morning, it was on the trailer and on its way. Drove onto the trailer under its own power - even though my reversing abilities weren't quite up to the task of getting it on there - been a while since I drove anything that size! I'd definitely recommend AVT to anyone - they definitely know what they're doing, service is fantastic and their pricing is very competitive. I'll definitely be using them again next time I need a vehicle moved.
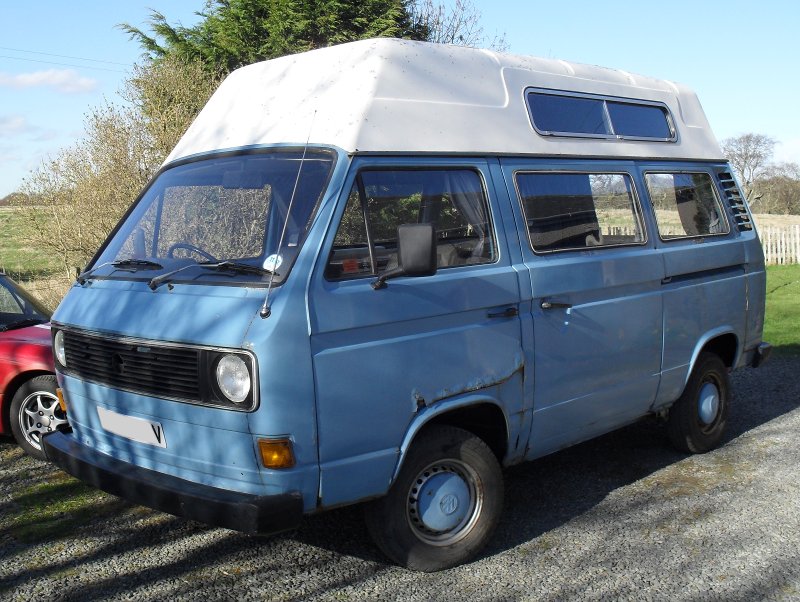
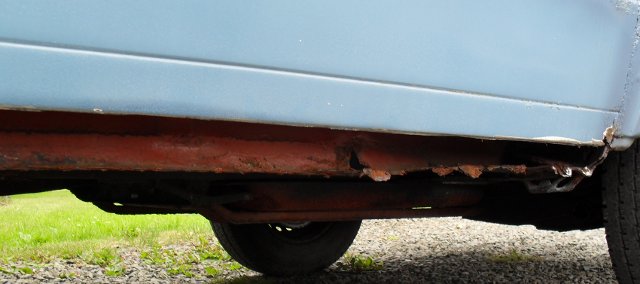
Having got it home I could at least get a better look at it, without getting torn to bits every five seconds by a very prickly tree! Below you see pretty much what I started out with.
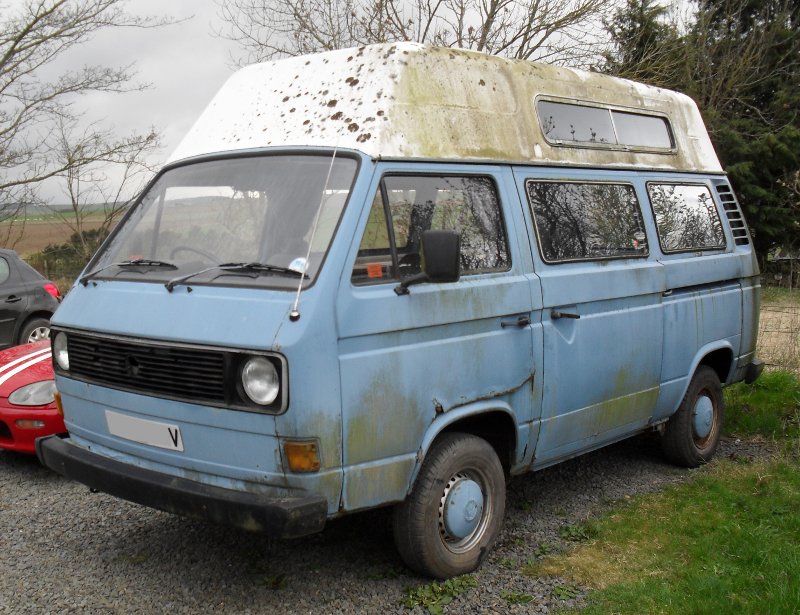
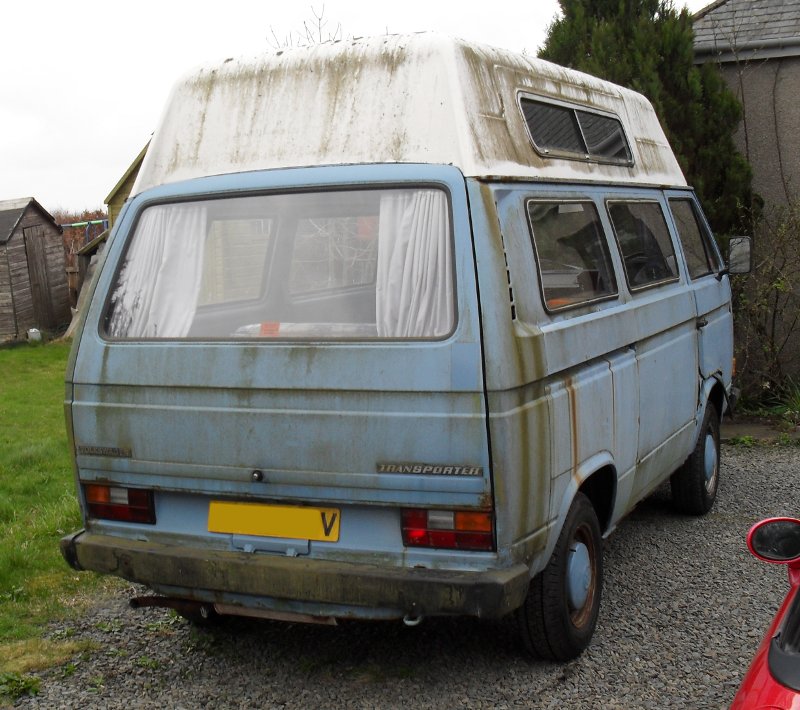
Thankfully, the vast majority of the green gunk you see there came off without too much of a fight once I got the pressure washer out. The roof required a slightly more aggressive approach, involving a lot of teetering at the top of a ladder while physically scrubbing it. There are still some marks left on the front where lichen had started to grow as well as the more conventional moss, which I'll hopefully tackle at a later date. The very top of the roof is still pretty disgusting...but I can't easily reach that...my ladder's not long enough! The plus side however is that nobody can see up there unless they're on the top deck of a double decker bus.
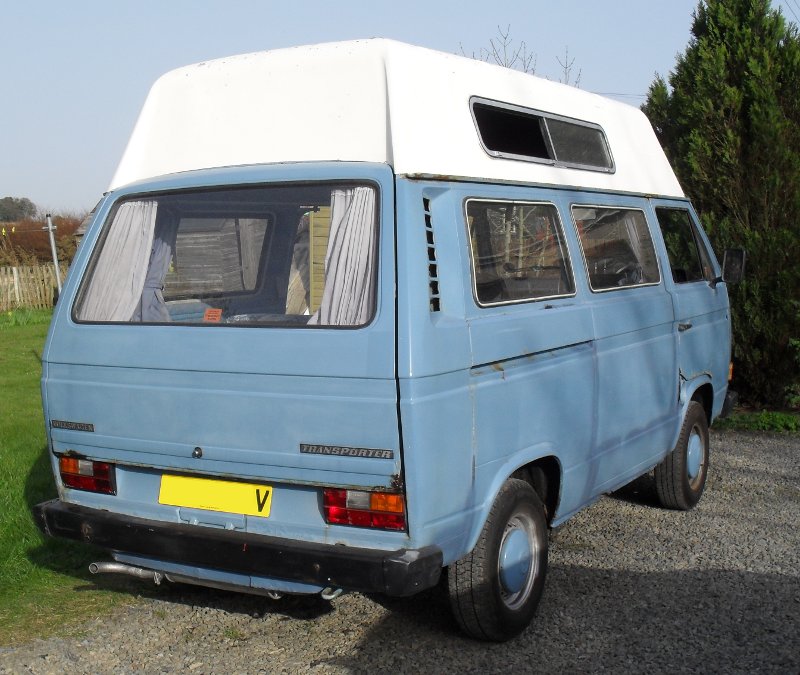
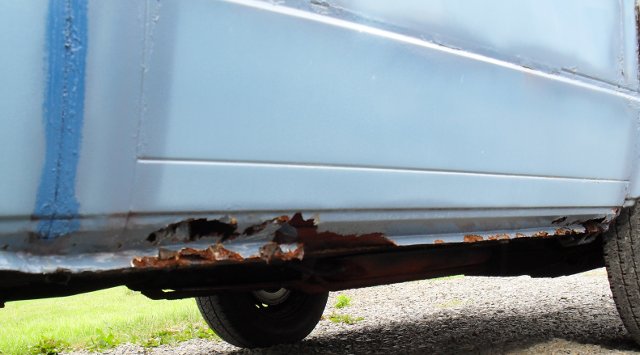
The image below is almost exactly the same angle as above, but with a bit of elbow grease, some rust treatment and some paint later, think you'll agree this looks a bit less dire!
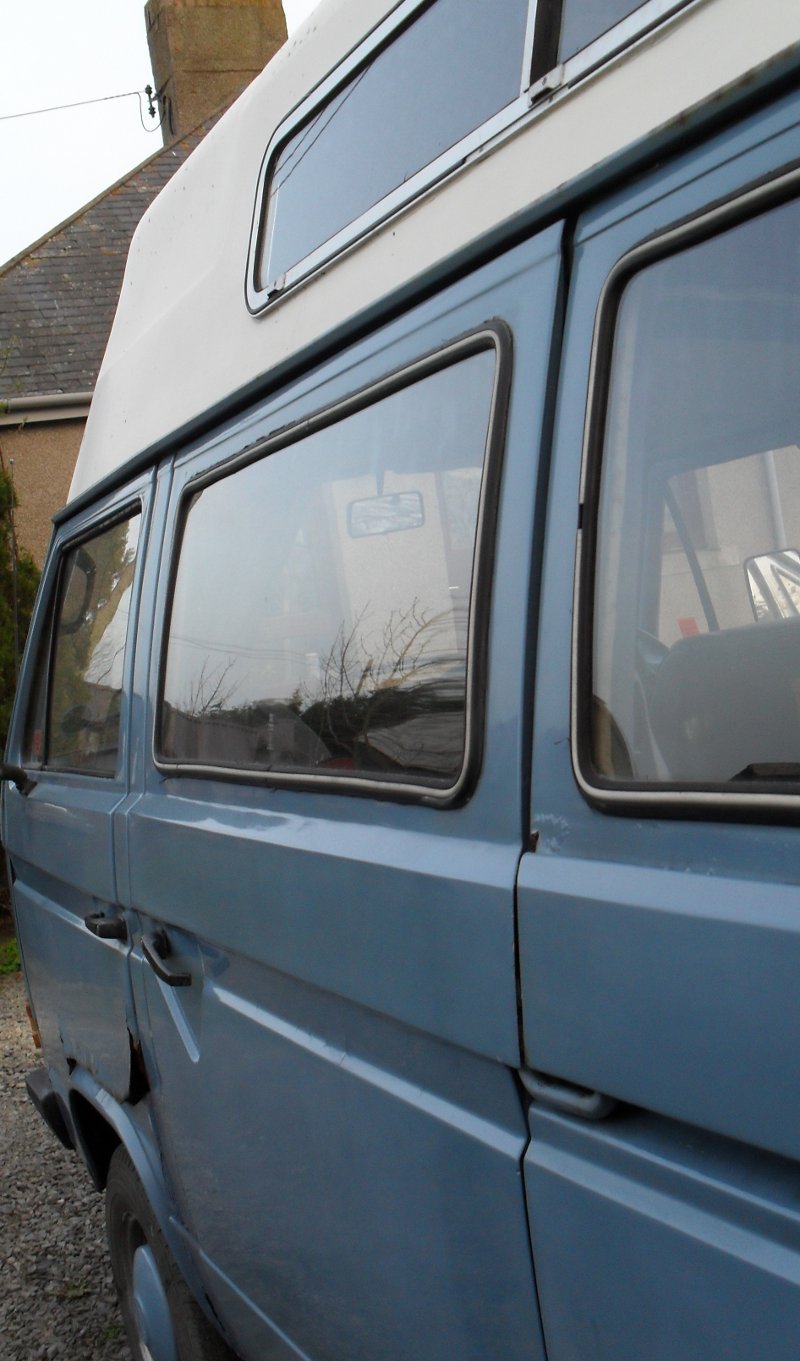
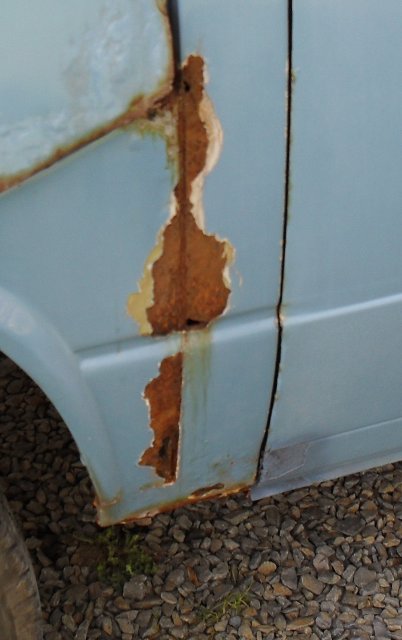
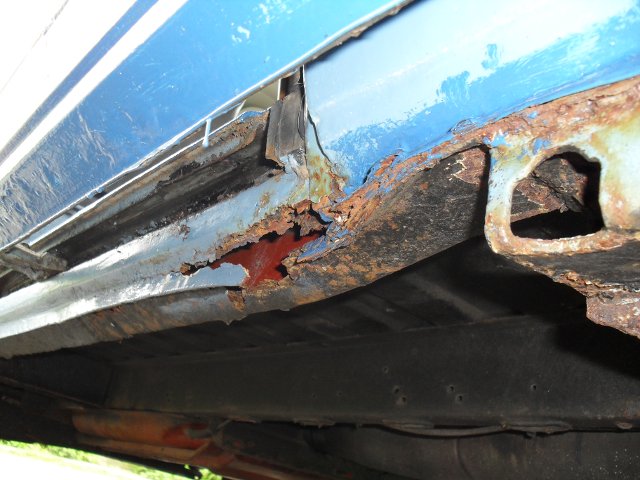
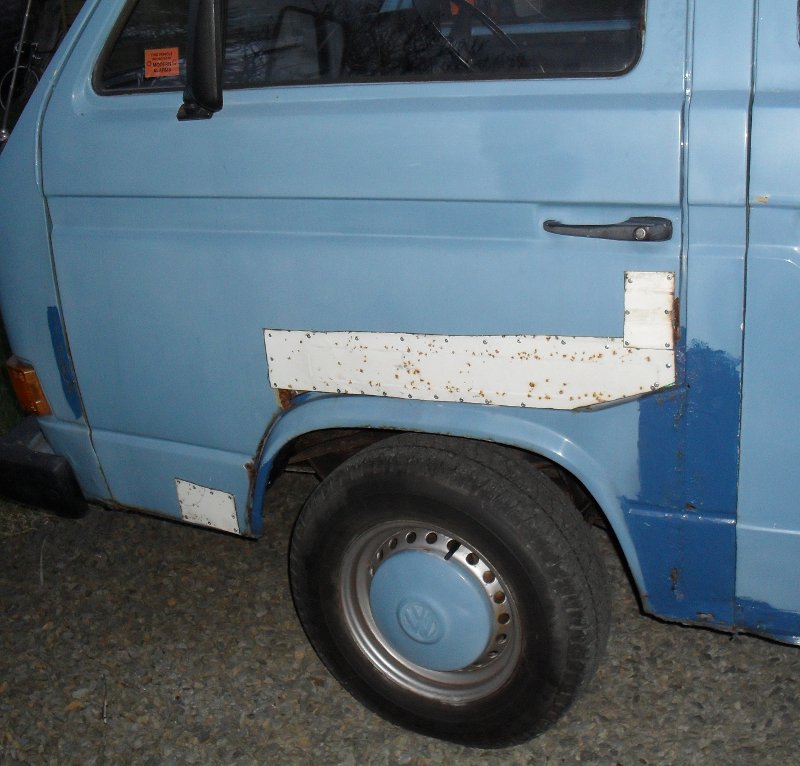
Initially I had expected the problems with the side door to be down to the bottom runner having dissolved. This would have been rather a pain as new panels aren't available for that (especially for the early T25s which have a different sliding door assembly to the later ones) and I would have had to either carry out some complex reconstructive surgery, or rely on parts cut from a scrapped van. As it turned out however, when I was picking up the site where the van had been parked after loading it onto the trailer, I noticed a little rubber cube, about an inch square, with a hole in one side. This I remembered seeing on a parts website a couple of days previously, and I was 99.9% sure was the "lower sliding door mounting bush." Sure enough, once I got the door open more than about a foot, the front half dropped clear off the vehicle. I'd been expecting it to do so, however was rather unprepared for the weight of it and how suddenly that happened. It rapidly became clear though that repair to the lower door runner is going to be limited to one postage-stamp sized patch needed right at the very rear of it, that I can deal with! It appears that the little rubber bush had jumped off the pin on the lower door runner simply due to a combination of brute force of someone opening the door combined with a completely dry runner. Getting it back on initially seemed like a task requiring the laws of geometry to be temporarily suspended until I had the bright idea to remove the runner assembly from the door - set it up in the groove, then bolt it back onto the door. You need a helper to hold the door, but this is by far the easiest way to do it. Getting into and out of the back it has to be said is a lot easier when the door can be opened, even if getting it open from the outside is still somewhat haphazard, as I think the spring which is meant to make the rear edge "pop" out when unlocked is either weak, damaged or missing. Closing it also requires a very firm slam if you don't push the back of the door inwards, but it does seem to be getting better with some use. The door itself appears to have been damaged slightly in the past, with the frame distorted so that the rear upper edge sits slightly too far out from the bodywork as can be seen below, meaning that it doesn't seal properly. Being dropped (twice!) probably didn't help here - neither will the wind tugging at it during the trip on the trailer. I'll keep my eyes open for another door - but early side doors in good condition at a sensible price are generally made of unobtainium. Both of the front doors as mentioned before have seen considerably better days (particularly the passenger's one). These however are identical throughout all years of T25 production, and are (relatively!) inexpensive. The driver's one may be saveable as the rot is confined to the door skin, the passenger's one however is fit for nothing but scrap.
The cleaning above actually took place on the second weekend of work - as the first was dogged by poor weather, so initially I turned my attention to cleaning up the interior.
Aside from being dusty, the cab in general wasn't really too bad. There are a few paint marks on the back of the seats which give away its early life as a van prior to the camper conversion, but for a 31 year old vehicle, it's quite presentable I think. Despite the seemingly barren interior compared to modern cars and vans, it's actually surprisingly comfortable up front. Just don't have an accident or whack your elbows (or head, like I did when cleaning the floor) on the dashboard, as it's metal!

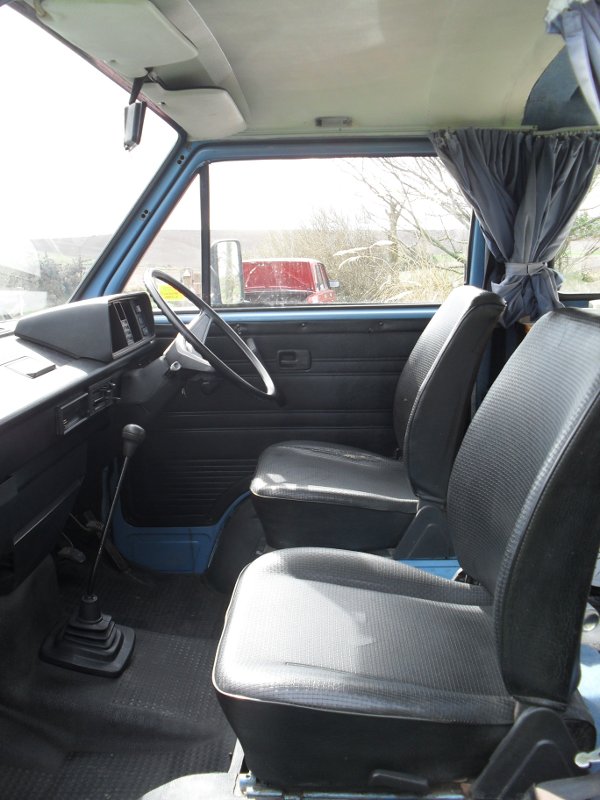
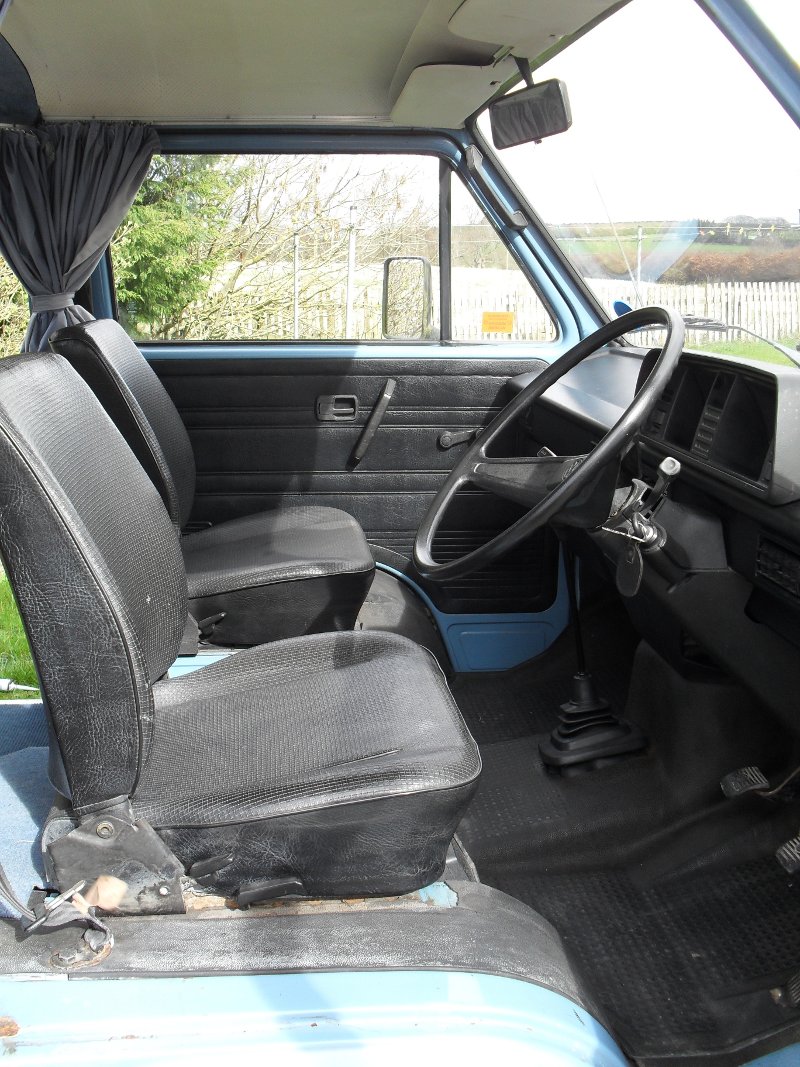
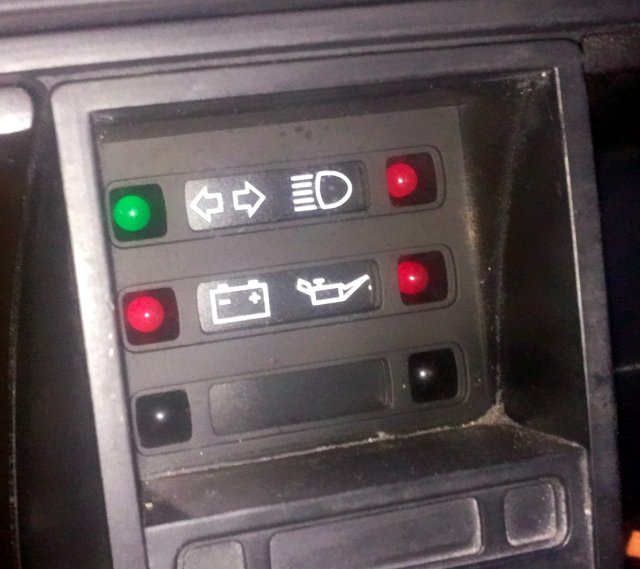
The instrumentation is a far cry from what you find in vehicles produced these days which tend to have about two hundred warning lights - you have to keep track of a total of four warning lights, a speedometer, odometer and a fuel gauge. That's it! The photograph below was taken at night simply because I've had a nightmare of a time getting a photograph without major problems with flash bounce-back. I'll try to get one on a sunny day sometime soon!
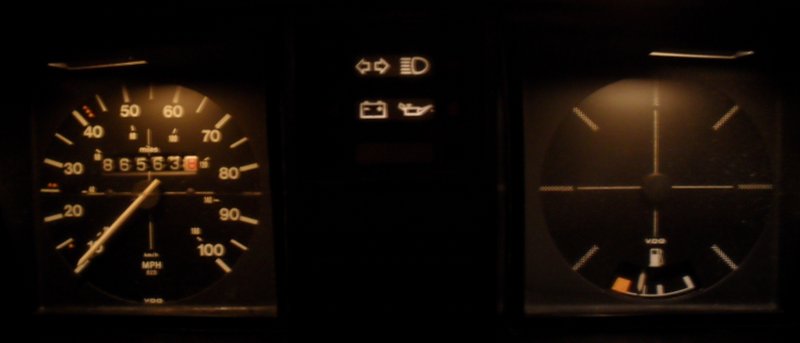
VW do get a note as far as instrumentation is concerned however for forward thinking. Present in this vehicle's instrument panel, and I believe around the same time on the Polo and Golf, are LED warning lights. They make a lot of sense in an automotive setting as they're essentially impervious to vibration, and have lifetimes in the regions of tens of thousands of hours - which for a dash indicator light is a lot! It wasn't until the latter part of the 1990s that these started to become a common sight in other cars. Obviously in 1980, blue LEDs didn't exist, so that wasn't an option for the main beam indicator. I believe this was a yellow LED in the Golf, but in the T25 it's a red one, first car I've seen with a red warning light for main beam. I've seen a couple of later ones where this is blue - and I'm assuming as they're still well before the invention of blue LEDs that a standard incandescent lamp with a blue filter was used for this, probably in response to drivers scratching their heads over the unusual colour choice.
Those dots on the speedometer are handy to have in the absence of a rev counter. The CT engine is not a power unit which likes to be revved hard (red-line being at 4200rpm). Unfortunately, being a boxer, it's a well balanced engine, and the T25 is very well sound insulated from the engine (especially with a bed on top of the engine cover), so it's very easy to over-rev it. Especially in light of the very limited power available to start with! It's for this reason that quite a number of people have rev limiters fitted to their vans. The dots however give you a guideline on where to change gear though. 1st up to the first dot just under 10mph, second to the two dots just over 25, and so on. Simple but effective.
Despite the reliability of LEDs, they are not immune to failure, as was demonstrated when the one for my indicators expired for no readily explicable reason a while ago. I think this just goes to demonstrate that even things that we take for granted as being unbreakable, after 30 odd years are rather less unbreakable!
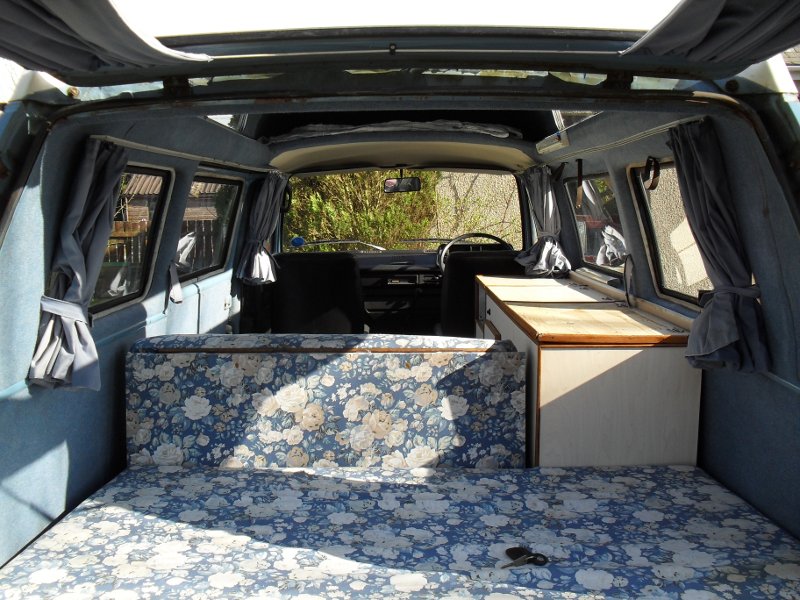
Moving back into the accommodation area, things were rather more grubby given the larger volume of soft furnishings, but aside from the moss growing in the sliding windows in the roof, it cleaned up fairly easily to be honest. The photograph below is quite an old one actually, but gives a general idea. The missing light cover has now been replaced - I was in the process of replacing a dodgy switch when this was taken.

Hidden just to the left of the frame is the cooker, the sink is hidden under the cover (the big black button is the switch for the pump for the tap), and the gas and water are stored under the work surface to the right of the seat. The table stows away above the cab when not in use. I wouldn't say that it's a back yard conversion this one, as it's been reasonably well done, but it's obvious from the method of some of the construction that this has been done by a person, rather than a company with custom made mass-produced parts just to slot in. I'd probably guess that the work was done by a small local firm. If a previous owner DID put this together on their driveway...they get my praise on a job well done!
The main bedding space is behind the seats, which is probably sufficient for one person to use - but the seat folds down as well to extend that space if required. In its standard form though, gives plenty of available boot space though when not used as a bed!
That boot space is of course augmented by storage space beneath the rear seat. Some of the fluids and things can actually live in the same area as the water and gas are stored as there's some spare space in there, which will free up a bit of room in here.
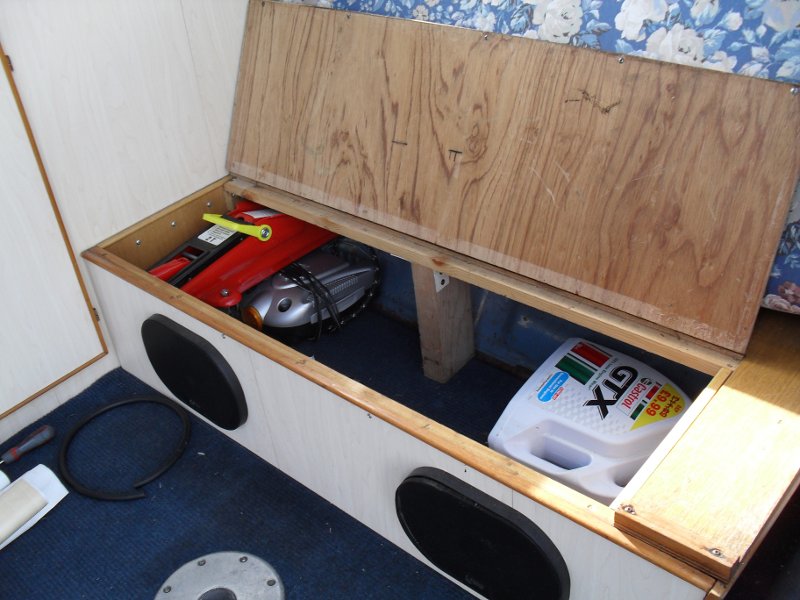
The enclosure actually acts as a very good sound box for the speakers mounted on the front, which give a surprisingly pleasing sound (with the lid closed!) for a generic pair of 6x9s.
Mechanically, aside from a good familiarisation and orientation session, relatively little work has been needed so far. I replaced the fuel filler neck as mentioned earlier as its rubber had dissolved, and have now replaced virtually every rubber fuel pipe on the vehicle. Only a couple were actually obviously leaking (the return lines, which were pouring fuel out!), but I decided that as most were the old fabric braided ones which I've had nothing but trouble from in the past to just do them all. The fuel filter was also changed at this point.
The old and filter have both been changed twice now - and aside from one slightly lazy tappet on cylinder no 1 at start-up, it sounds quite healthy now. Checks were made to ensure that the cooling system, including the thermostat was working as intended, and replacement spark plugs, distributor cap, HT leads, rotor arm etc will be fitted at a later date. As it's running quite well just now and the important bits inside the engine are now being looked after by nice new oil, I'm going to concentrate on the structural repairs for now.
The brakes I am astonished to say seem to have survived their hibernation incredibly well. While I will be replacing all of the rubber lines as a matter of course given their age, the braking system as a whole is working. Both calipers on the front are working as are both rear drums - handbrake included. There's a little bit of drag from the offside rear drum (which will also need a new back plate), but very little - you can still easily push the vehicle around the driveway! It's quite capable of locking all four wheels, and is even stopping in a straight line. To say I have been surprised by how co-operative the brakes have been so far would definitely be an understatement.
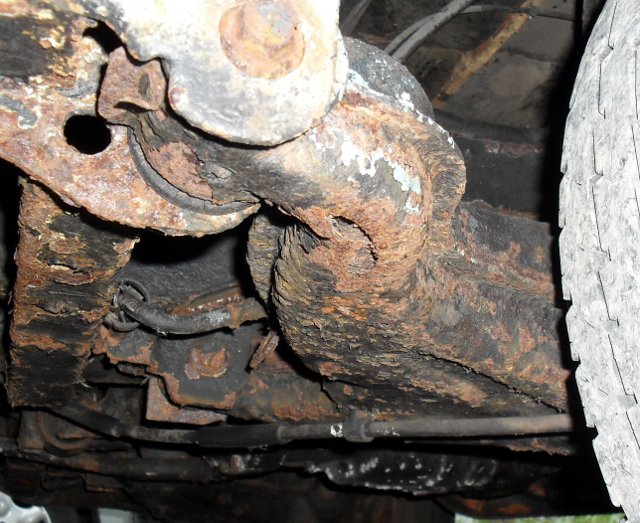
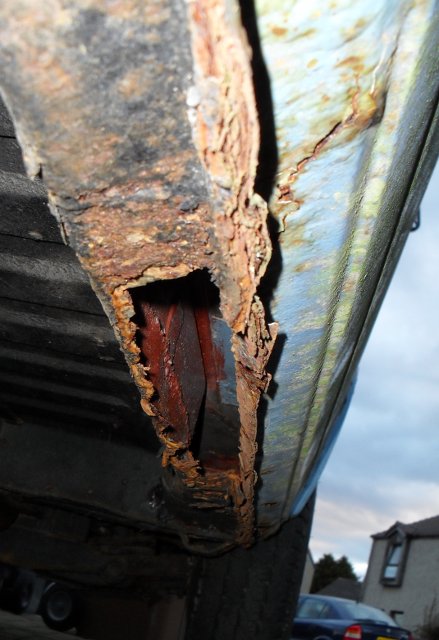
Surprisingly, not a huge amount more rust than expected has been found - there's plenty of it make no mistake - but most was spotted during the initial inspection to be honest. Two main exceptions being the bottom of the nearside B pillar which is shot (and was obviously shot when the van was painted many years ago judging from the 1cm or so of filler on top of the rust under the paint), and the nearside rear suspension arm which after I poked it with a screwdriver now has a large hole in it. That makes me sad as dismantling the rear suspension isn't something that's high on my list of "things I'd really like to do."
Whether I want to or not though - this has to be replaced...no question about that! The chassis outrigger to the left of that image, despite looking like something picked up off the wreck of the Titanic is actually solid. Its partner at the opposite side of the van is another matter mind you...
The offending bit of the B Pillar on the nearside is also shown below - this is before I'd stripped all the paint and filler off - but gives a bit of an idea of how much there was under the paint! This repair is going to be a ways down the list - so I slathered the area in general with Kurust and re-applied a top-coat to keep the weather off in the interim. At least that should slow the decay a bit.
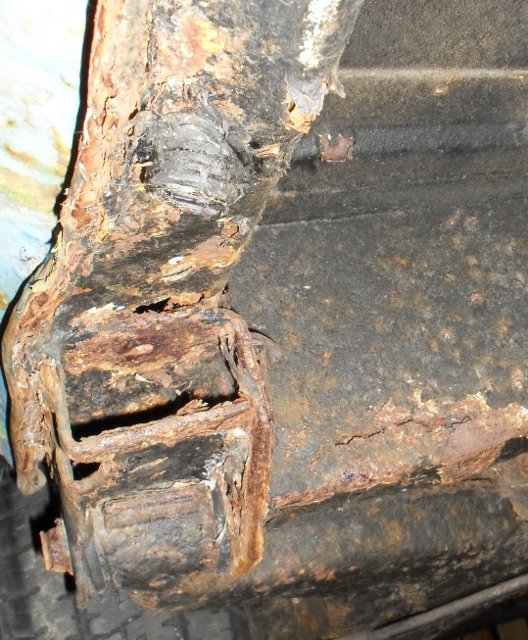
The worst of the rust, as expected was found to be confined to the drivers side sills, both inner and outer. A brief poke around with a screwdriver revealed this:
The bottom inch or so of the outrigger below is shot as well. The little black thing poking out of the sill is the drain from the washbasin in the kitchen.
Rather more determined poking with a screwdriver resulted in pretty much the entire bottom of the sill dropping clean out - which when the perforated outer sill was removed - left this.
It's also knackered further back where the trailing arm mount attaches as well. Basically - this ain't a patch job - we need an entire new inner and outer sill! These are both available - the only source I seem to have been able to track down (VW themselves, who have failed to respond to enquiries, aside) is VW Heritage who have (November 2011) genuine VW replacement inner sills in stock. At GBP140 odd they're not cheap though, and currently a home-made solution involving 60mm square 3mm steel box section is being pondered. I've been a Lada owner for too long, and am a great fan of building what you can rather than buying where it's an option. It's highly likely that I'll end up buying the sill anyway - but currently it's being pondered.
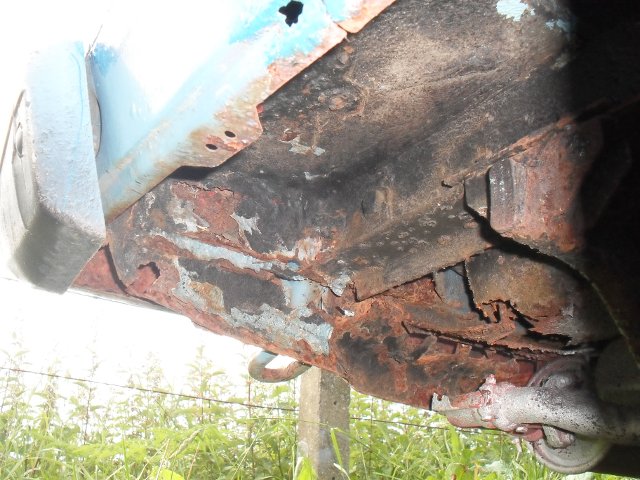
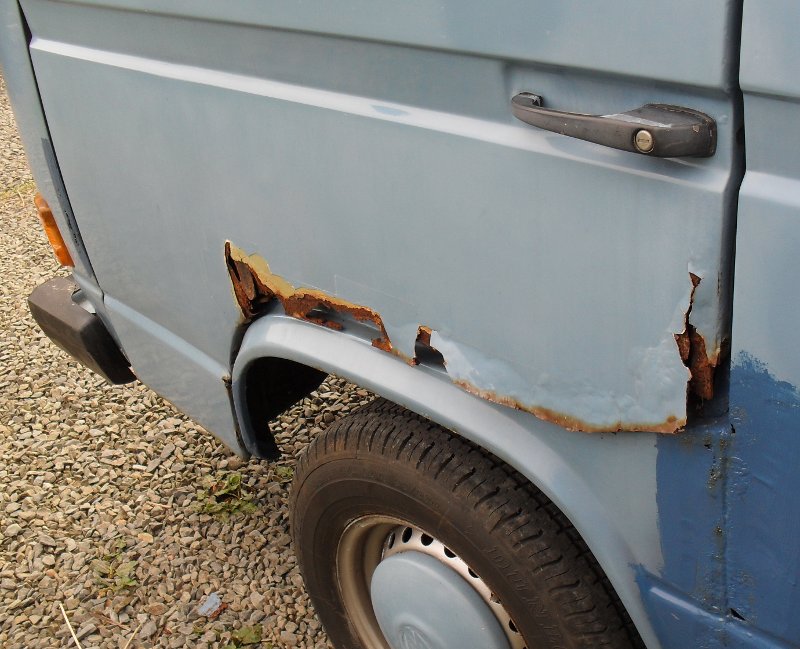
Further back on the drivers side there is more rust - where the rear panel meets the rest of the van - the rear panel itself to be honest I think contains more filler than metal, so will need either major reconstructive surgery or replacement - The huge great crack in the middle below kind of gives the game away that something isn't right...sheet metal doesn't generally crack like this!
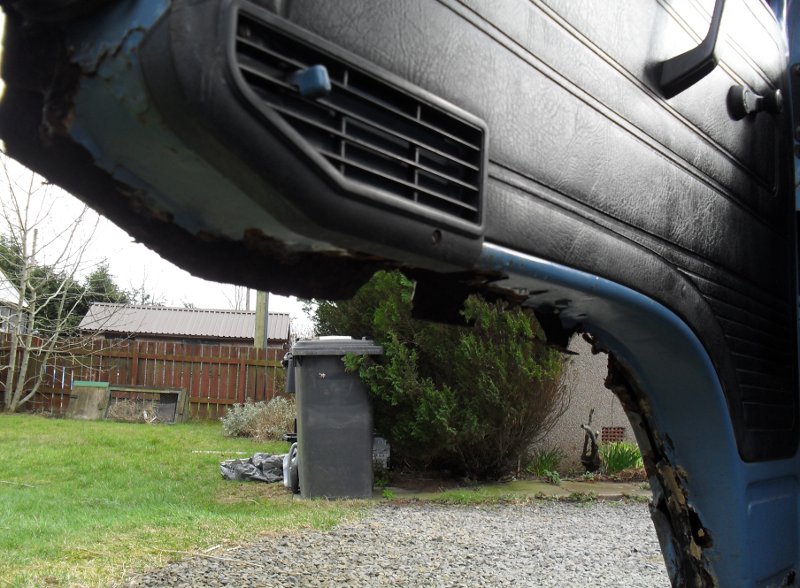
Before I can deal with that though, I need to try to make some sense of what's left of what's *behind* that panel...This I suspect will be all manner of fun. The heat shield is knackered in that corner as well - as that's not structural though I'm less worried about repairing/replacing that as it needs to be heat-proof rather than actually holding the van together...
The sill on the passengers side does have "issues" in a number of places - but I'm pretty convinced that it's salvageable - the sliding door track save for one hole right at the rear end is intact. This is a good thing as they are exceedingly expensive! I was quite surprised from the look of it that did didn't actually disintegrate much further when exposed to brute force and a screwdriver. This shot does give a good look at the general condition of the floorpan and chassis though in the background.
While real reconstructive surgery has mostly been on hold pending me scrabbling together enough pennies to buy a new offside sill, I've been trying to tidy other bits and pieces up in the meantime.
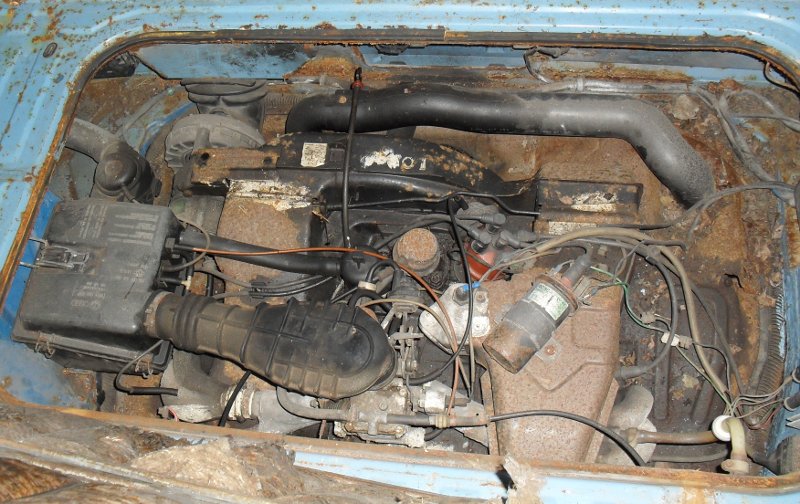
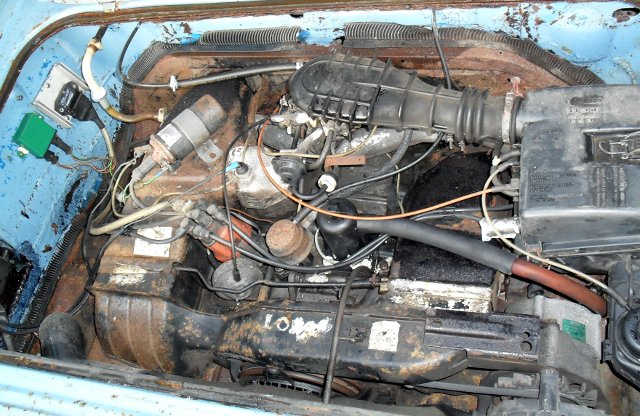
First up was cleaning the engine bay - as every time I so much as looked at the engine I was coming away covered in oil - ten minutes with the pressure washer and some degreaser soon sorted that out. It apparently doesn't care in the slightest about water either - started first touch after the clean.
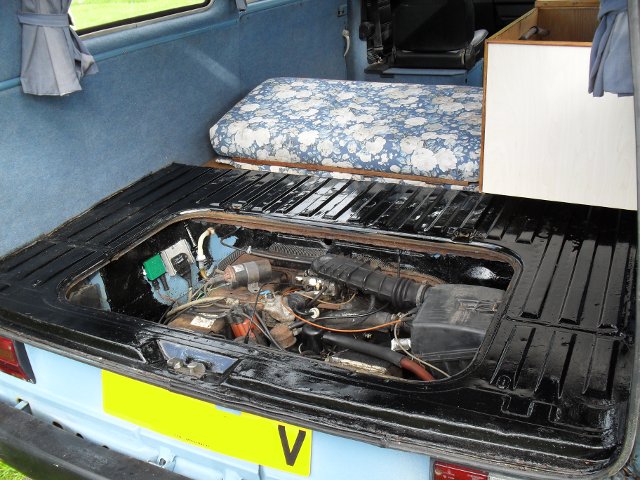
The load bay also had a lot of surface rust and generally looked a mess - so that's been rust treated and re-painted. I need to remove some of the wiring etc from the wall of the engine bay to finish painting in there - this is an in progress photo!
Update: 20th March 2012.
So winter did a good job of putting things on hold for a while, arriving very abruptly and with little warning. Wasn't much I could do save for attack the underside with several gallons of rust proofing and do my best to get the upper half weathertight - easier said than done! Still, it seems to have weathered the winter not too badly.
Last weekend the first real progress of the year was made. New sill for the offside is to be ordered in the next month so that can be sorted, so attention was turned to a few of the other less critical but still in the way of an MOT bits of rust. Firstly the passengers door (both of the cab doors will be replaced at some point in the future, so only a stop-gap measure was needed).
Suffice to say, this door has some issues...
Actually worse than it looks, we discovered that about the bottom three inches of the inside down by the step was primarily filler! Welder is currently out of commission - and I still lack the finesse to handle welding thin metal together, instead tending to end up with more holes in the piece I'm working with than when I started. Still...it's just a door, not a bit of chassis leg so we can probably get away with something a bit more, well inventive. So after a couple of hours, a sore wrist and enough rivets to construct your average WWII submarine, we arrived at this point. Not finished yet, but my hand had decided that enough was enough with the rivet gun! Pretty? No...nothing like. It is surprisingly solid though, even with the bottom 1/3 still to do and several more bits of bracing still to do. All trace of flex in the frame has now been eliminated and it closes now with a good, solid "thump" rather than sounding like something Rolf Harris would use.
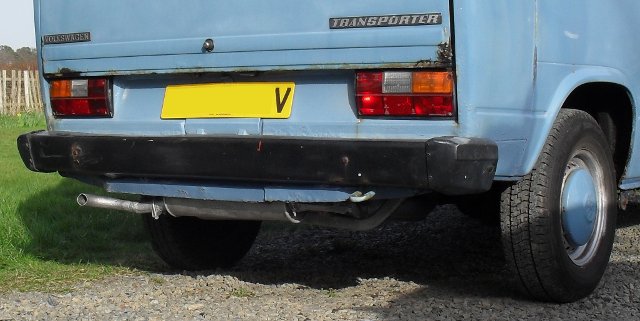
The bumper on the nearside had obviously had a shunt at some point in the past which had poked the mounting point through it where there was already some rust. Replacement is the end solution obviously, but getting the bumper serviceable isn't hard given that it's just a U shaped piece of pressed steel. Plate behind the hole and a re-drilled mounting have it securely in place for the time being. I'll be putting a cover over the area where the hole is shortly both to further strengthen it and to get rid of any sharp edges.
While the bumper was off, I decided to tackle the rear panel, which I knew when I started was basically scrap. Thankfully the actually structural part between the chassis legs is by and large fine, save for the very far right hand side which has dissolved - shouldn't be too bad a fix though. Everything below bumper height was completely and totally shot however and just fell apart when touched.
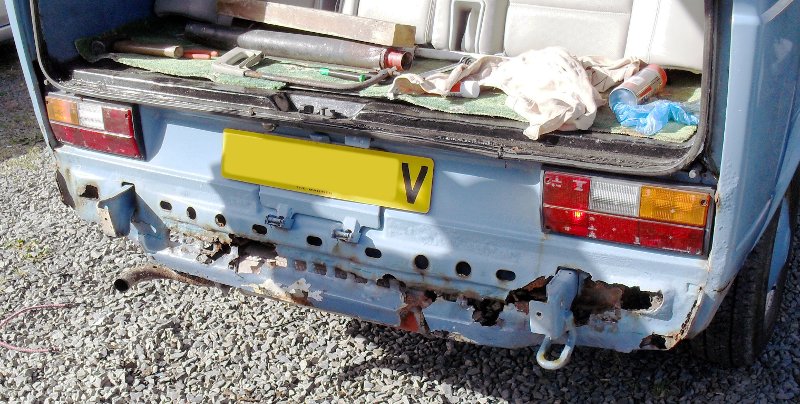
I decided that there wasn't any point in messing around with this - there are going to have to be some incisions made to check out, repair and rust-proof the beam behind here, and everything below the bumper was so frilly as to be useless. So everything below bumper height was simply chopped off. To be honest, save for the silencer being a bit more visible you never would notice the valance wasn't there.
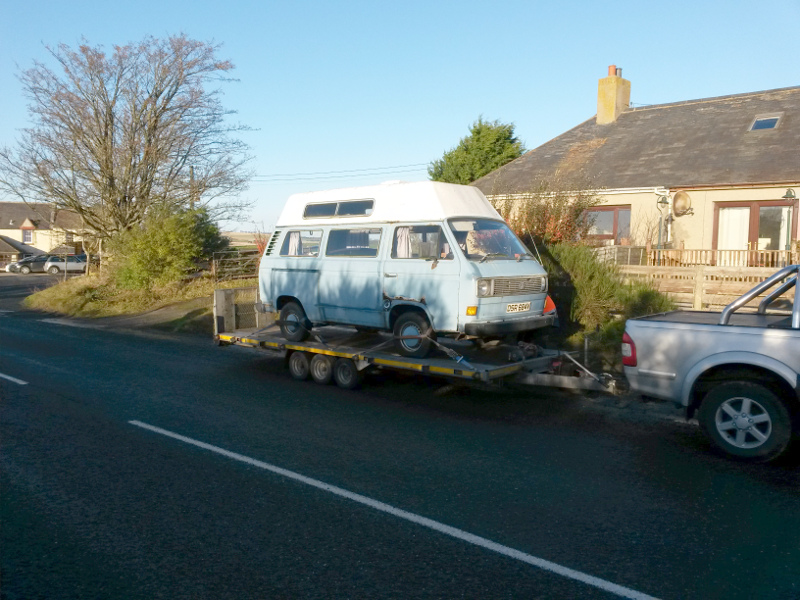
I sadly never made any more progress with this as my mother passed away suddenly in 2014 meaning I lost the ability to store this at my folks' house. Getting it transported to the other end of the country wasn't going to be financially viable, so it was passed on to another keeper, hopefully to be restored one day. Even if not hopefully it would be able to yield some useful parts to keep other vans going.
Here she was when loaded up just before departing.
Manufacturer: Volkswagen.
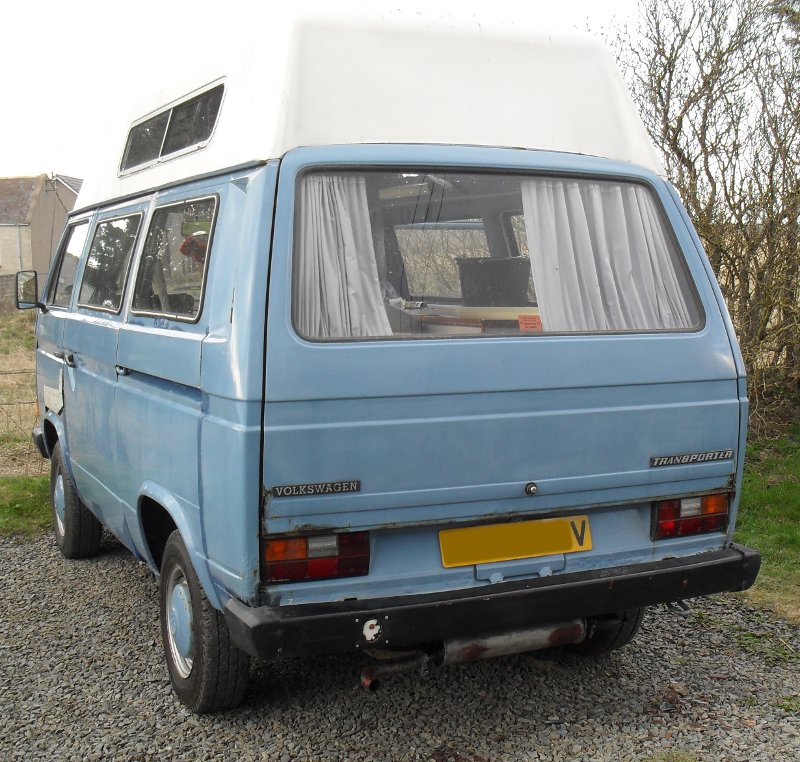
Model: Transporter. Camper-van conversion.
Engine: 1.6 litre air-cooled flat-four.
Gearbox: 4-speed manual.
Power output: 50bhp.
0-60mph: A Very Long Time.
Max speed: About 75mph apparently...must be downhill, with a strong tail-wind.
Page last updated: 20th May 2023 (minor formatting changes).
![]()
![]()